
If your organization is running non-critical, interruptible workloads, you may be looking for potential savings. I’m talking about Azure Spot Virtual Machines (VMs). By tapping into Azure’s unused capacity, you can achieve up to a 90% discount compared to standard pay-as-you-go rates. In this article, I’m going to walk you through exactly what they are, when to use them, and how to deploy them like a pro.
Azure Spot VM
What is an Azure Spot VM?
To understand a Spot VM, you have to understand how Microsoft manages its data centers in regions like East US or West US 2. To ensure that every “standard” customer can spin up a server instantly, Microsoft maintains a massive surplus of hardware.
Instead of letting that hardware sit idle, Microsoft rents it out at a massive discount. The catch? It’s interruptible. If a full-paying customer needs that capacity, Azure will give you a 30-second notice and evict your VM.
Spot VM vs. Standard VM: The Breakdown
| Feature | Standard (Pay-As-You-Go) | Azure Spot VM |
| Pricing | Fixed hourly rate | Up to 90% discount |
| Availability | 99.9% to 99.99% SLA | No SLA (Interruptible) |
| Best Use Case | Production, Web Servers | Batch jobs, Dev/Test, AI training |
| Eviction Notice | N/A | 30 Seconds |
Strategic Use Cases
I strictly recommend Spot VMs for “disposable” or “stateless” workloads. If your application can’t handle a sudden reboot, do not put it on Spot.
- Batch Processing: Ideal for a logistics company running nightly route optimizations. If the VM is evicted, the job simply restarts when capacity is available.
- AI and Machine Learning: US tech firms are currently using Spot VMs for large-scale model training. Since these jobs often use “checkpoints,” an eviction only loses a few minutes of progress.
- CI/CD Build Agents: Development teams often use Spot VMs to run their automated test suites. It’s a low-cost way to run hundreds of parallel tests.
- Visual Rendering: Animation studios leverage Spot capacity for massive frame-rendering tasks, saving thousands of dollars per project.
The deployment starts in the standard Azure Portal, but there is one specific “fork in the road” that determines your savings.
- Sign in to the Azure Portal.
- Search for Virtual Machines in the top search bar.
- Click Create > Azure virtual machine.
- Select your Subscription and Resource Group (e.g.,
Prod-Data-RG). Check out the screenshot below for your reference.
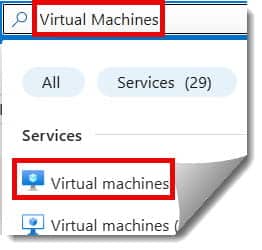
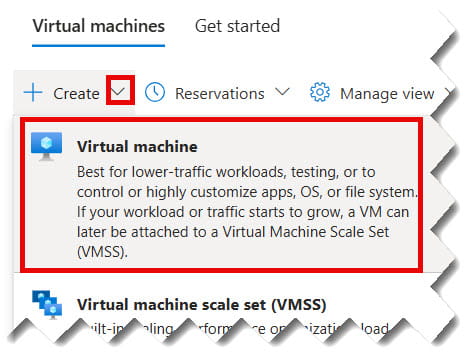
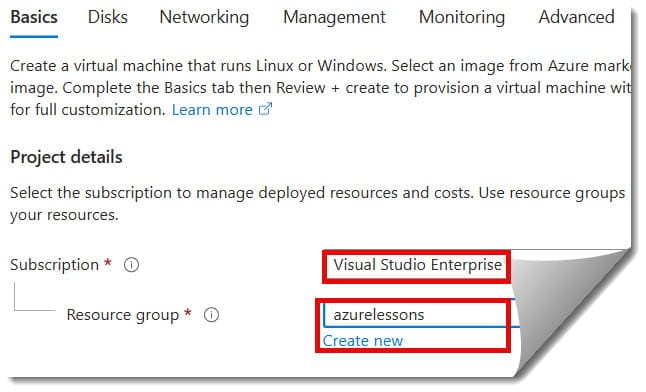
Choosing the Right US Region
Not all regions have the same surplus. For example, East US might be “expensive” during New York business hours, while West US 2 (Washington) might have deep discounts. Always check the Pricing History tool (more on that below).
Step 2: Enabling the Spot Discount
Under the Basics tab, locate the Instance details section.
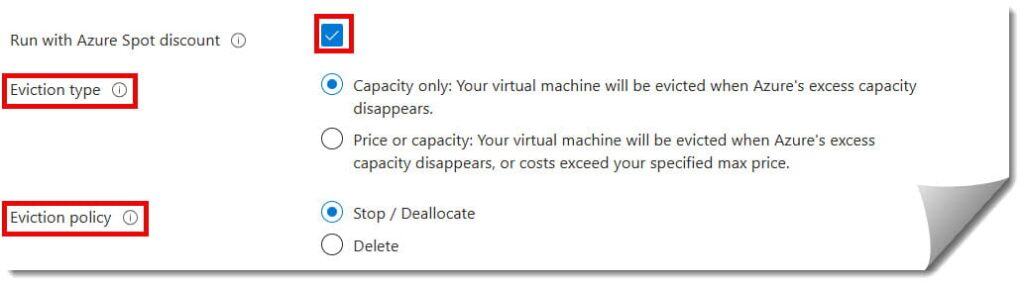
- Find the checkbox for Azure Spot instance.
- Select Yes.
- This will expand the Eviction type and Eviction policy options. Check out the screenshot below for your reference.
Step 3: Configuring Eviction Types and Policies
This is the most technical part of the setup. If you get this wrong, you might lose more than just a VM—you might lose your data.
Eviction Type: Capacity vs. Price
- Capacity Only (Recommended): Your VM is only evicted if Azure physically needs the hardware. You pay the current Spot price (capped at the standard rate). This is the “stickiest” option.
- Price or Capacity: You set a “Max Price” (e.g.,
$0.08/hr). If the market price in your region hits$0.09/hr, your VM is evicted even if capacity is available.
Eviction Policy: Deallocate vs. Delete
- Stop / Deallocate: The V