
In this tutorial, I’ll walk you step-by-step through how I ordered, configured, loaded, and safely shipped an Azure Data Box from our facility in Illinois directly to Microsoft’s datacenter.
Azure Data Box
What is Azure Data Box?
Azure Data Box is a ruggedized physical storage appliance shipped directly to your datacenter or office by Microsoft. You load your local files onto the device over high-speed Local Area Network (LAN) connections (using standard protocols like SMB or NFS) and ship it back via a national carrier.
Once it arrives at the designated Microsoft datacenter, Azure engineers copy your data directly into your target Blob storage accounts or Azure Files shares.
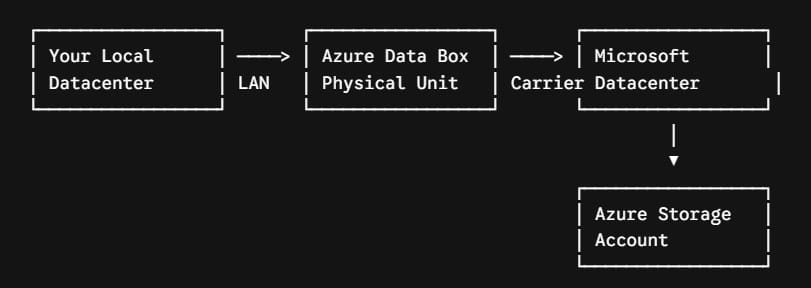
The Azure Data Box Family Overview
Depending on your total dataset size, Microsoft offers several appliance variations tailored for different capacity requirements:
| Device Variant | Usable Capacity | Network Interfaces | Best For |
| Data Box Disk | ~35 TB (up to 5 SSDs) | USB 3.0 / SATA | Small-to-medium transfers, remote office branches |
| Data Box (Standard / Next Gen) | 80 TB to 525 TB | 10 GbE / 100 GbE (RJ45, SFP+, QSFP28) | Full data center exits, massive archive migrations |
| Data Box Heavy | ~770 TB usable | Multiple 40 Gbps QSFP+ | Petabyte-scale enterprise migrations |
For our 80 TB dataset, the standard Azure Data Box unit was the perfect fit.
Step-by-Step Tutorial: Moving Local Data to Azure
Step 1: Prerequisites and Azure Portal Setup
Before ordering the physical unit, I ensured our local environment and Azure tenant were prepped.
- Create Target Storage Accounts: Log into the Azure Portal, navigate to Storage Accounts, and create your destination storage account (e.g.,
apexlogisticsdata01). Ensure the region matches where your workloads will run (we choseEast US). - Verify Access Permissions: Ensure your Azure IAM role contains Owner or Contributor rights on the subscription, plus explicit access to the target storage resource.
- Check Network Gear: Verify that your switch rack has available 10 GbE SFP+ or 100 GbE ports and appropriate Twinax or fiber cabling ready near your target storage servers.
Step 2: Ordering the Azure Data Box
Order the device through the Azure Portal.
Azure Portal ──> Search "Azure Data Box" ──> Create New Order ──> Set Shipping & Storage- In the search bar at the top of the Azure Portal, type Azure Data Box and select it.
- Click + Create.
- Fill in the primary details:
- Subscription: Select your active enterprise subscription.
- Resource Group: Select your target resource group (e.g.,
rg-migration-chicago). - Source Region: USA / United States.
- Destination Azure Region:
East US.
- Select Data Box as your transfer type.
- Enter your Shipping Address (e.g., your facility in Chicago, IL) and contact notification emails.
- Under Destination Targets, map the unit to your pre-created storage account (
apexlogisticsdata01). - Review details and click Create.
Step 3: Unboxing and Physical Setup
Within a few business days, UPS delivered the ruggedized Data Box container to our loading dock.
Security Note: The Azure Data Box does not come in a cardboard box. The device itself is encased in a hardened, tamper-evident outer shell equipped with security tags and a digital E-ink shipping display label.
- Inspect for Tampering: I checked the tamper-evident stickers around the outer casing to confirm no physical interception occurred during transit.
- Set Up Power and Connectivity:
- Unclip the front and back device panels.
- Plug in the standard IEC power cord.
- Connect the 10 GbE SFP+ DATA 1 port directly into our core datacenter switch using a Twinax copper cable.
- Connect the 1 GbE MGMT port to our local management subnet.
- Power On: Press the power button on the front control panel.
Step 4: Configuring the Device and Unlocking Encryption
Every Data Box is hardware-encrypted via AES 256-bit encryption and requires a temporary passkey from your Azure Portal to unlock locally.
- Go back to your Azure Portal and navigate to your Data Box order.
- Under Device Details, copy the IP Address, Username, and Device Password.
- Open a browser on a local laptop connected to the management subnet and enter the device IP address: Plaintext
https://192.168.1.100 (Default local web UI) - Log in using the credentials retrieved from the portal.
- Under Network Settings, assign a static IP address to the 10 GbE Data Interface.
- Navigate to Unlock Device, paste the device unlock password, and click Unlock.
Once unlocked, the appliance exposes network shares configured for SMB and NFS.
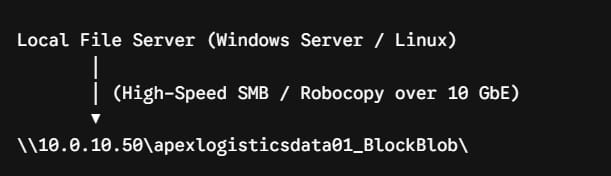
Windows SMB Example:
- Open File Explorer or Command Prompt.
- Connect to the Data Box SMB share: DOS
net use Z: \\10.0.10.50\apexlogisticsdata01_BlockBlob /user:DataBoxUser - Use multi-threaded copy tools like Robocopy to saturate the link without dropping files: DOS
robocopy D:\ArchiveData Z:\Archives /MT:32 /R:1 /W:1 /B /COPYALL /LOG:C:\logs\databox_copy.log
Pro Tip: Avoid copying millions of tiny individual files (under 1 MB) directly. Zip or package small files into larger archives before transferring to maximize network interface throughput.
Step 6: Finalizing and Shipping Back to Microsoft
Once all 80 TB was copied to the local shares, we initiated the return preparation phase.
- Run Validation: In the Data Box Local Web UI, navigate to Prepare to Ship and click Start Preparation. The appliance runs a check to confirm checksums and format compatibility.
- Shut Down: When the web UI displays Ready to Ship, shut down the unit and disconnect all power and network cables.
- E-Ink Display Update: The built-in E-ink display automatically updates from your delivery address to Microsoft’s datacenter return shipping address. No paper shipping labels required.
- Hand Off to Carrier: Schedule a pickup with the regional logistics carrier specified in your Azure return instructions.
Step 7: Cloud Ingestion & Compliance Verification
Once the carrier delivers the Data Box back to the Microsoft datacenter, the final automated phase begins:
- Ingestion into Azure Storage: Microsoft engineers rack the unit and copy data directly into your target Blob containers or File shares. You can track real-time upload status inside the Azure Portal.
- Review Ingestion Logs: Upon completion, access the Copied Files Log and Error Log in the Azure Portal to confirm 100% of files landed safely.
- NIST Compliance Data Wipe: Microsoft automatically sanitizes the physical drives on the Data Box in compliance with NIST SP 800-88 R1 standards, so no residual data remains on the device.
Azure Data Box Security Features
Azure Data Box relies on multi-layered protections:
- AES 256-bit Hardware Encryption: All written data is encrypted at rest using BitLocker hardware encryption automatically.
- Tamper-Evident Physical Seals: Custom chassis screws, physical stickers, and intrusion detection logs prevent physical access to internal drives.
- Secure Boot & TPM 2.0: Ensures the device firmware has not been modified or compromised in transit.
- No Plaintext Passwords: Lock/unlock passwords are never stored locally on the unit; they are generated dynamically in your authenticated Azure Portal.
Key Takeaways
Using Azure Data Box allowed our team to move 80 TB of critical enterprise data into Azure in under a week without dropping a single packet on our operational business network.
If you are staring down a major migration, disaster recovery seeding project, or datacenter exit with strict timelines, offline migration via Data Box is often the safest, fastest, and most reliable strategy available.
You may also like the following articles:

I am Rajkishore, and I am a Microsoft Certified IT Consultant. I have over 14 years of experience in Microsoft Azure and AWS, with good experience in Azure Functions, Storage, Virtual Machines, Logic Apps, PowerShell Commands, CLI Commands, Machine Learning, AI, Azure Cognitive Services, DevOps, etc. Not only that, I do have good real-time experience in designing and developing cloud-native data integrations on Azure or AWS, etc. I hope you will learn from these practical Azure tutorials. Read more.
