
In this comprehensive article, I will walk you through my battle-tested framework for planning, assessing, and executing an enterprise-grade migration to Microsoft Azure using Azure Migrate.
Azure Migrate
What is Azure Migrate?
Azure Migrate is Microsoft’s unified platform for discovering, assessing, and migrating on-premises workloads—including virtual machines, physical servers, databases, web apps, and virtual desktop infrastructure—directly to the Azure cloud.
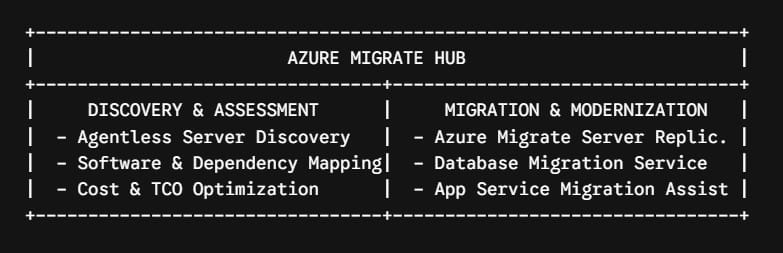
Rather than forcing you to stitch together disparate third-party utilities, Azure Migrate provides native tools alongside integrated ISV (Independent Software Vendor) solutions.
Key Capabilities at a Glance
| Functionality | Core Capability | Typical Enterprise Benefit |
| Unified Hub | Single glass plane to track discovery through cutover | Eliminates tool sprawl and centralizes progress reporting. |
| Agentless Discovery | Appliance-based scanning for VMware, Hyper-V, and AWS/GCP | Zero agent overhead on source workloads during initial scanning. |
| Dependency Analysis | Visual maps of server-to-server network calls | Prevents broken app links by identifying multi-tier dependencies. |
| Azure Readiness Assessment | Automatic compatibility analysis and target sizing | Ensures specs match workload CPU, RAM, and IOPS requirements. |
| Cost & TCO Modeling | Right-sizing based on actual performance data | Prevents over-provisioning and leverages Azure Hybrid Benefit. |
Pre-Migration Strategy
Azure Migrate gives you the analytical data needed to classify each workload into one of these paths:
- Rehost (Lift-and-Shift): Moving virtual machines to Azure IaaS VMs without structural changes.
- Replatform (Lift-and-Shape): Shifting workloads to managed PaaS services (e.g., migrating a SQL database to Azure SQL Managed Instance or a web app to Azure App Service) with minimal code changes.
- Refactor (Re-architect): Rewriting legacy monolithic code to take advantage of cloud-native microservices, serverless functions, or Kubernetes.
- Repurchase: Replacing an on-premises platform with a SaaS offering (e.g., switching local Exchange to Microsoft 365).
- Retain: Keeping specialized workloads on-premises due to regulatory mandates or recent hardware investments.
- Retire: Decommissioning legacy servers that are no longer actively used.
Complete Tutorial: Executing a Migration with Azure Migrate
Here is my standard operational runbook for executing an end-to-end migration using Azure Migrate.
Phase 1: Setting Up the Azure Migrate Project and Appliance
To begin, you need to create an Azure Migrate project and deploy the lightweight collector appliance inside your local environment.
Step 1: Initialize the Project in Azure
- Sign in to the Azure Portal and search for Azure Migrate.
- Under Servers, databases and web apps, select Discover, assess and migrate.
- Click Create project, choose your Target Subscription and Resource Group (e.g.,
rg-migration-prod-eastus), and assign a name to your project. - Select your preferred target geography (e.g., United States).
Step 2: Deploy the Local Appliance
Azure Migrate uses a lightweight virtual machine (the Azure Migrate Appliance) to conduct discovery without requiring local software agents on every host.
- For VMware Environments: Download the pre-configured Open Virtualization Format (
.OVA) template from the portal. - For Hyper-V Environments: Download the compressed VHD file.
- For Physical Servers or Other Public Cloud Instances (AWS/GCP): Download the PowerShell installer script to run on a dedicated Windows Server host.
Once imported into your hypervisor, open the Appliance Configuration Manager web interface, configure network settings, authenticate with Azure, and register the appliance to your project.
Phase 2: Agentless Discovery & Software Inventory
Once the appliance connects to your management systems (such as VMware vCenter or Hyper-V Hosts), agentless discovery begins.
What Gets Discovered?
- Host hardware specifications (vCPUs, assigned RAM, disk allocations).
- Real-time performance telemetry (CPU utilization, memory usage, disk IOPS, throughput, network I/O).
- Software inventory, including installed applications, OS patches, and web apps.
- Database instances (SQL Server, MySQL, PostgreSQL) running across discovered servers.
Security Note: The appliance only requires read-only administrative credentials on your vCenter server or Hyper-V cluster. No sensitive application payload data ever leaves your internal network.
Dependency Analysis
To avoid breaking multi-tier application architectures, enable Dependency Analysis. Azure Migrate visually graphs network traffic across active TCP connections, revealing hidden interdependencies—such as a legacy accounting system silently making backend calls to a database host in a separate rack.
Phase 3: Comprehensive Assessment and Cost Modeling
Raw inventory data alone isn’t enough to build an executive business case; you need actionable assessment metrics. Azure Migrate provides tailored assessment engines for different workload types.
Sizing Criterion: Performance-Based vs. As-On-Premises
When creating an assessment, you will choose between two primary sizing rules:
- As-On-Premises: Replicates exact host CPU and RAM configurations into matching Azure VM sizes. This often leads to unnecessary costs, as on-premises infrastructure is frequently over-provisioned.
- Performance-Based (Recommended): Analyzes historical performance metrics captured by the appliance over a defined sample period (e.g., 7 to 30 days). It applies a safety buffer factor (e.g., 1.3x) to right-size target Azure instances based on actual usage patterns.
Financial Optimization Levers
- Azure Hybrid Benefit (AHUB): Bring existing Windows Server and SQL Server licenses with Software Assurance to Azure to lower running costs.
- Reserved Instances (RI): Commit to 1-year or 3-year term agreements for predictable workloads to secure significant cost reductions compared to pay-as-you-go pricing.
Phase 4: Replication and Cutover Execution
Once your assessment is complete and target resource groups are provisioned, it is time to replicate data and execute cutover.
Step 1: Configure Replication
- Navigate to Azure Migrate: Server Migration.
- Select your target settings: Target Subscription, Virtual Network (VNet), and Subnet allocation.
- Select the target VM size, OS disk type (Premium SSD v2, Standard SSD, or Ultra Disk), and availability zones.
- Initiate Initial Replication.
During initial replication, a full copy of the virtual disk is transferred securely over the network to Azure Managed Disks.
Step 2: Continuous Delta Sync
After the initial sync finishes, Azure Migrate maintains continuous delta synchronization, copying only modified data blocks at set intervals. This step runs quietly in the background without affecting production applications.
Step 3: Run Test Migrations (Mandatory Validation)
Never execute a production cutover without running a test migration first.
- Right-click the replicated instance in the Azure Migrate Portal and select Test Migration.
- Choose an isolated Test Virtual Network (isolated from your production network to avoid IP collisions).
- Azure Migrate creates a point-in-time clone of the VM in Azure.
- Perform application integration checks, user acceptance testing (UAT), and database integrity tests.
- Once verified, select Clean up test migration to remove the test resources.
Step 4: Final Production Cutover
During an approved maintenance window:
- Initiate the cutover action within Azure Migrate.
- Select Shut down local virtual machine before migration to prevent data drift and guarantee zero data loss.
- The migration tool performs a final delta sync, shuts down local source machines, and turns on the new target VMs in Azure.
- Update internal DNS records or traffic manager routes to point traffic to the newly assigned Azure IP addresses.
Frequently Asked Questions (FAQ)
Is Azure Migrate free to use?
Yes, Azure Migrate is a free native hub provided by Microsoft. You do not pay for the Azure Migrate service itself or discovery/assessment appliances. You only pay for standard Azure infrastructure consumed during replication (such as temporary storage account usage and snapshot storage) and for the target compute resources provisioned in Azure upon migration.
How does agentless discovery differ from agent-based discovery?
Agentless discovery runs through a centralized collector appliance connected to hypervisors like vCenter or Hyper-V, making it faster to deploy without modifying source operating systems. Agent-based discovery requires installing a lightweight agent on each source operating system; it is primarily used when deep application dependency tracking or granular OS-level metrics are required across physical servers.
Can I use Azure Migrate to move workloads from AWS or Google Cloud to Azure?
Yes. Azure Migrate treats AWS EC2 instances, Google Cloud Compute instances, or physical bare-metal servers similarly. You can discover and replicate them using the physical server migration workflow.
Final Thoughts
A successful cloud migration isn’t about moving server images as fast as possible; it’s about establishing a scalable, secure, and cost-effective cloud environment.
By using Azure Migrate, you replace guesswork with telemetry-driven assessment data, right-size your target infrastructure, and minimize downtime during production cutovers. Plan your discovery phase carefully, validate your application dependencies early, and test your application thoroughly.
You may also like the following articles:

I am Rajkishore, and I am a Microsoft Certified IT Consultant. I have over 14 years of experience in Microsoft Azure and AWS, with good experience in Azure Functions, Storage, Virtual Machines, Logic Apps, PowerShell Commands, CLI Commands, Machine Learning, AI, Azure Cognitive Services, DevOps, etc. Not only that, I do have good real-time experience in designing and developing cloud-native data integrations on Azure or AWS, etc. I hope you will learn from these practical Azure tutorials. Read more.