
In this article, I will walk you through everything you need to know about Azure App Registration. We will cover core identity concepts, step-by-step creation workflows, credential management, permission models, and security best practices.
Azure App Registration
What is an Azure App Registration?
At its core, an Azure App Registration is the mechanism that establishes a trust relationship between your custom application and the Microsoft identity platform. By registering your application in Microsoft Entra ID (formerly Azure Active Directory), you give Microsoft’s identity provider the necessary context to authenticate users, issue OAuth 2.0 access tokens, and authorize calls to protected APIs like Microsoft Graph or custom backends.
When you register an application, Microsoft Entra ID creates two distinct objects in the tenant:
- Application Object: The global blueprint or definition of your application, containing its core configuration settings (such as application name, supported account types, and branding).
- Service Principal Object: The local representation (or instance) of the application within a specific tenant. It governs the actual permissions, access policies, and assignment of users/groups to the application in that specific directory.
Application Object vs. Service Principal
To clarify how these two identity components work together, consider their structural differences:
| Feature | Application Object | Service Principal Object |
| Scope | Global definition (lives in the home tenant). | Local instance (lives in every tenant where used). |
| Purpose | Defines the app’s metadata, redirect URIs, and scopes. | Controls runtime access, token issuance, and enterprise policies. |
| Multi-Tenancy | Single primary record maintained by the app owner. | Replicated in target directories when multi-tenant consent is granted. |
| Modification | Updated directly by the application developer/owner. | Managed by tenant administrators in the local directory. |
Supported Account Types and Tenant Scopes
When setting up your application, Microsoft Entra ID provides four primary account options:
- Single Tenant (
Accounts in this organizational directory only): Restricted strictly to users and guest accounts inside your specific Microsoft Entra tenant. This is the recommended choice for internal line-of-business (LOB) applications. - Multi-Tenant (
Accounts in any organizational directory): Allows users from any Microsoft Entra tenant (such as enterprise customers or partners) to authenticate. This option is ideal for commercial SaaS products. - Multi-Tenant + Personal Microsoft Accounts: Enables sign-ins from both enterprise Microsoft Entra accounts and consumer accounts (e.g.,
@outlook.com,@live.com,@xbox.com). - Personal Microsoft Accounts Only: Reserved exclusively for consumer-facing apps that do not interact with corporate Entra directories.
Choosing the Right Tenant Scope
| Account Type Choice | Intended Audience | Security Risk Level | Recommended Primary Use Case |
| Single Tenant | Internal employees & vetted guests | Low | Internal company tools, HR portals, finance dashboards |
| Multi-Tenant | Business customers across organizations | Medium | B2B SaaS solutions, vendor integration tools |
| Multi-Tenant + Personal | Broad enterprise & consumer base | High | Multi-purpose productivity tools, public utility utilities |
| Personal Only | General public / Consumer accounts | Low to Medium | Gaming apps, personal consumer utilities |
Core Components of an Azure App Registration
Understanding the key properties inside the Azure Portal is critical when setting up identity flows correctly. When I inspect an existing registration, these are the primary elements I review:
1. Identifiers
- Application (Client) ID: A unique GUID assigned by Microsoft Entra ID that identifies your application globally. You will pass this string in every OAuth 2.0 authorization request.
- Directory (Tenant) ID: A unique GUID representing your specific Entra directory. For single-tenant applications, this guarantees that requests are routed to your organization.
2. Redirect URIs (Reply URLs)
The location where the Microsoft identity platform sends authentication responses (authorization codes or tokens) after a user signs in.
- Platform Configurations: You must explicitly select the target platform (Web, Single-Page Application (SPA), Mobile/Desktop, or iOS/Android).
- Security Requirement: HTTPS is strictly required for production URIs (HTTP is permitted only for
localhostduring local development).
3. Authentication Credentials
Applications acting as confidential clients (such as backend web APIs or automated daemons) need credentials to prove their identity when requesting tokens:
- Client Secrets: Secret keys generated in the portal. While easy to configure, they carry security risks if leaked and require strict rotation schedules.
- Certificates: Asymmetric x509 public/private key pairs. Highly recommended over client secrets for enterprise workloads.
- Federated Credentials (OIDC): Allows workloads running on platforms like GitHub Actions, Kubernetes, or AWS to authenticate without requiring long-lived secrets.
Step-by-Step Walkthrough: Creating an Azure App Registration
Here is the exact sequence I follow when provisioning a new application in Microsoft Entra ID:
Step 1: Access the Microsoft Entra Admin Center
- Navigate to the Azure Portal (
portal.azure.com) or Microsoft Entra Admin Center (entra.microsoft.com). - Log in with an account holding at least the Application Developer or Cloud Application Administrator role.
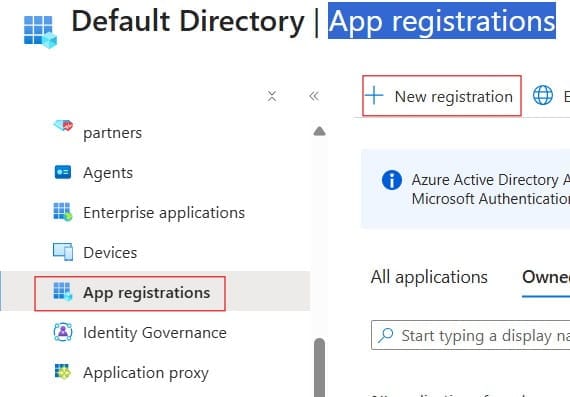
- In the left navigation menu, expand Manage and select App registrations. See the screenshot below for reference.
Step 2: Register the Application
- Select + New registration at the top of the blade.
- Enter a user-friendly Name (e.g.,
Enterprise-Reporting-Service). - Select your Supported account type based on your architecture requirements (e.g., Single Tenant).
- Under Redirect URI, choose the appropriate platform (e.g., Web or Single-page application) and input your application callback endpoint.
- Click Register.
Step 3: Record Application Details
Once registered, you will be redirected to the Overview page. Copy and securely store the following values in your configuration management system (such as Azure Key Vault):
- Application (Client) ID
- Directory (Tenant) ID
Step 4: Configure Credentials & Secrets
If your app runs as a confidential backend server:
- Select Certificates & secrets from the left navigation.
- Under the Client secrets tab, select + New client secret.
- Add a description, set an expiration window (Microsoft enforces a maximum lifetime of 24 months; I typically recommend 6 to 12 months), and click Add.
- Copy the Secret Value immediately. This value will be permanently masked once you navigate away from the page.
Step 5: Configure API Permissions
- Select API permissions from the left menu.
- Click + Add a permission and select the API you need to call (such as Microsoft Graph).
- Select between Delegated permissions or Application permissions.
- Check the specific scopes needed and click Add permissions.
- If the scopes require elevated privilege, click Grant admin consent for [Your Organization].
Delegated vs. Application Permissions
One of the most common configuration errors I fix in enterprise environments involves choosing the wrong permission type. Microsoft Entra ID divides API permissions into two fundamental models:
Delegated Permissions (On-Behalf-Of User)
Delegated permissions are used when an application acts on behalf of a signed-in human user.
- The application’s effective privilege is limited by intersection: it can only perform actions that both the application has been granted and the signed-in user has authorization to perform.
- Examples: Reading a user’s personal profile (
User.Read), accessing the user’s personal OneDrive files (Files.Read), or sending emails as the signed-in user (Mail.Send).
Application Permissions (Direct Daemon Access)
Application permissions are used when an application runs as a background service, daemon, or scheduled task without any signed-in user present.
- The application acts with its own identity and access rights directly.
- Because application permissions grant broad access across tenant resources, they always require Admin Consent.
- Examples: Reading all user profiles in the company (
User.Read.All), reading audit logs (AuditLog.Read.All), or sync processes.
Permission Types Comparison
| Aspect | Delegated Permissions | Application Permissions |
| User Presence | Requires an active, signed-in user. | No user required (runs as a background process). |
| Access Boundary | Constrained by user’s personal RBAC rights. | Accesses target resources across the entire directory scope. |
| Token Context | Contains user context claims (scp, upn, oid). | Contains application context claims (roles, appid). |
| Consent Model | User consent (for low-risk) or Admin consent. | Mandatory Admin Consent required in all cases. |
| Typical Flow | OAuth 2.0 Authorization Code Flow + PKCE. | OAuth 2.0 Client Credentials Flow. |
Exposing Custom APIs and Defining Scopes
Azure App Registration is not just for consuming Microsoft APIs—it also allows you to protect your own custom backend services. When I build microservice architectures, I register both the client application and the web API backend as separate app registrations.
To expose a custom API:
- Navigate to your backend API’s app registration.
- Select Expose an API from the left menu.
- Click Set next to Application ID URI (defaults to
api://<client-id>). - Click + Add a scope to define access controls:
- Scope name: e.g.,
Reports.Read - Who can consent?: Admins and users or Admins only
- Admin display name & description: Clear details explaining what access this scope provides.
- Scope name: e.g.,
- Save the scope. Your client applications can now explicitly request access to
api://<client-id>/Reports.Read.
Common Troubleshooting & Error Codes
When working with Azure App Registrations, you will occasionally encounter OAuth error response codes. Knowing how to interpret these errors speeds up diagnostic work significantly:
AADSTS50011(The redirect URI specified in the request does not match):- Cause: The callback URL sent by your application code does not match any entry configured under the Redirect URIs blade in the portal.
- Fix: Check for exact string matches, including trailing slashes and HTTP vs. HTTPS protocol handlers.
AADSTS65001(The user or administrator has not consented to use the application):- Cause: The application is requesting permissions or scopes that require explicit tenant consent that has not yet been granted.
- Fix: Navigate to API permissions in the Azure Portal and click Grant admin consent.
AADSTS7000215(Invalid client secret is provided):- Cause: The application sent an incorrect, expired, or malformed client secret string.
- Fix: Verify that you copied the secret Value rather than the secret ID, or generate a fresh client secret.
Summary
Mastering Azure App Registration is essential for building secure, scalable cloud applications within the Microsoft identity framework.
You may also like the following articles:
- Microsoft Entra ID Sign-In Logs: Where to Find
- How To Get Microsoft Entra ID
- What are the main benefits of using Microsoft Entra ID
- How To Setup Microsoft Entra ID

I am Rajkishore, and I am a Microsoft Certified IT Consultant. I have over 14 years of experience in Microsoft Azure and AWS, with good experience in Azure Functions, Storage, Virtual Machines, Logic Apps, PowerShell Commands, CLI Commands, Machine Learning, AI, Azure Cognitive Services, DevOps, etc. Not only that, I do have good real-time experience in designing and developing cloud-native data integrations on Azure or AWS, etc. I hope you will learn from these practical Azure tutorials. Read more.