
In this comprehensive tutorial, I will walk you through the distinct administrative frameworks within Azure, show you the step-by-step process to grant admin rights securely via the Azure Portal, and share production-level governance strategies to keep your cloud environment secure.
How to Grant Admin Rights to User in Azure Portal
The Two Halves of Azure Administration: IAM vs. Entra ID
Before clicking anything in the portal, you must understand a critical architectural concept. Azure divides administrative privileges into two completely separate control planes:
- Azure Identity Administrators (Microsoft Entra ID Roles): This tier governs your identity perimeter. It includes tenant-level management tasks, such as creating user accounts, adjusting enterprise domain settings, assigning software licenses, and configuring global multi-factor authentication (MFA) rules.
- Azure Resource Administrators (Azure RBAC Roles): This plane controls your actual cloud infrastructure resources. It handles permissions for managing virtual networks, provisioning virtual machines, tuning databases, and deploying storage accounts.
The table below breaks down these two domains side-by-side so you can select the correct path for your team:
| Administrative Scope | Governance Layer | Core Privileged Roles | Primary Operational Actions |
| Directory Tenant Level | Microsoft Entra ID | Global Administrator, User Administrator, Helpdesk Administrator | Managing user accounts, configuring SSO apps, registering corporate domains |
| Infrastructure Resource Level | Azure RBAC | Owner, Contributor, User Access Administrator | Deleting VMs, provisioning storage accounts, altering virtual network routing |
Managing the Infrastructure: Granting Resource Admin Rights (RBAC)
If your goal is to let a cloud engineer manage infrastructure assets—like a cluster of web applications inside a specific subscription—you will use Azure Role-Based Access Control (RBAC).
Step 1: Define Your Target Scope
Azure applied permissions hierarchically: Management Groups $\rightarrow$ Subscriptions $\rightarrow$ Resource Groups $\rightarrow$ Individual Resources.
Always assign roles at the lowest possible level that still allows the user to do their job. If a developer only needs to manage test machines in a dev environment, grant access at the specific Resource Group level—not the entire Subscription.
Step 2: Open Identity and Access Management (IAM)
- Sign in to the Azure Portal using an account that holds Owner or User Access Administrator privileges at the targeted scope.
- Navigate to the top search bar and search for the scope you want to manage (e.g., click Subscriptions or Resource groups).
- Select your specific target asset from the provided interface list.
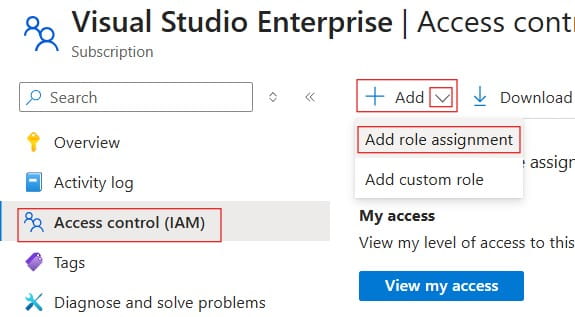
- Look at the left navigation menu blade and click on Access control (IAM).
Check out the screenshot below for your reference.
Step 3: Configure the Role Assignment
- Inside the IAM dashboard, click the + Add button at the top, then select Add role assignment from the dropdown options.
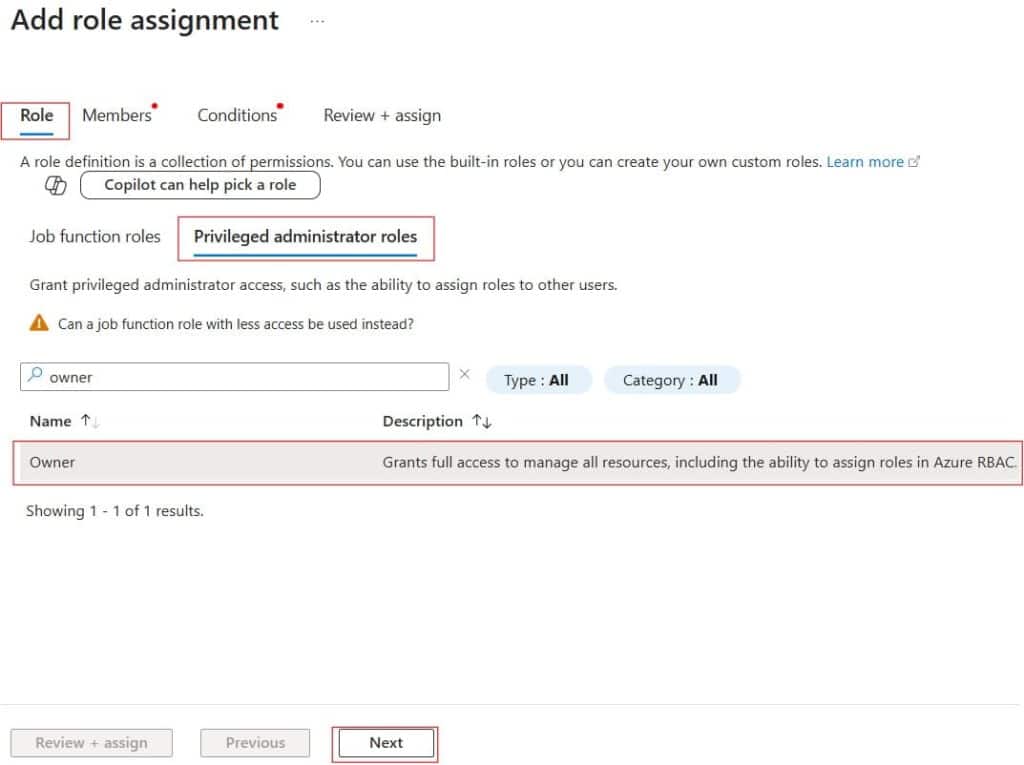
- Under the Role tab, browse to the Privileged administrator roles filter option.
- Choose the appropriate admin level:
- Owner: Full access to manage all resources and the ability to assign permissions to other users.
- Contributor: Full access to manage all resources, but cannot alter permissions for others.
- Click Next.
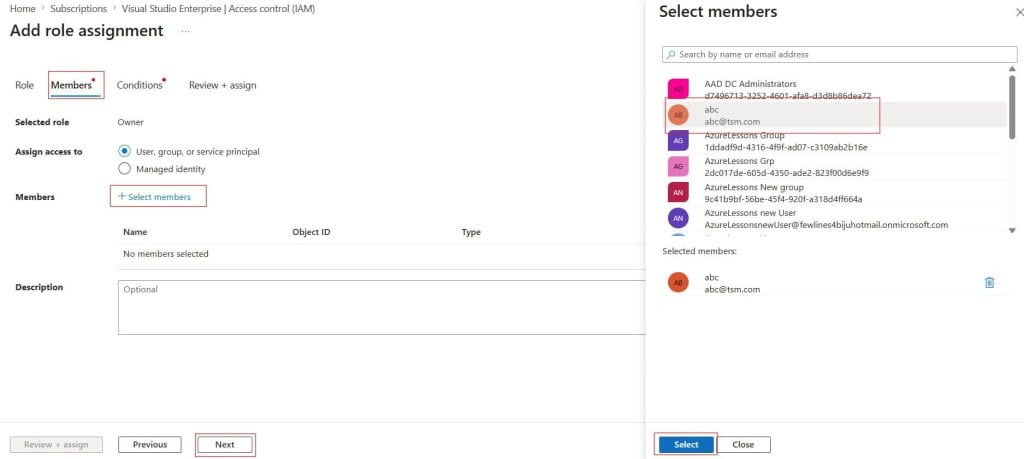
- On the Members tab, ensure User, group, or service principal is checked, then click Select members.
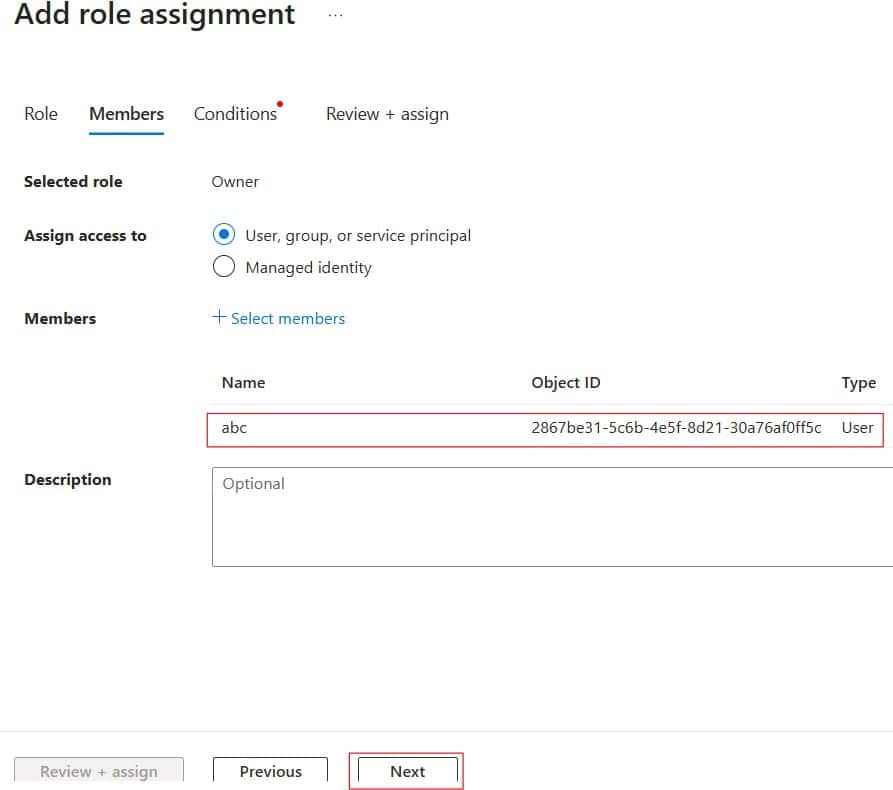
- Type the exact email address or corporate name of the target user in the lookup text field, click their name, and click the Select button.
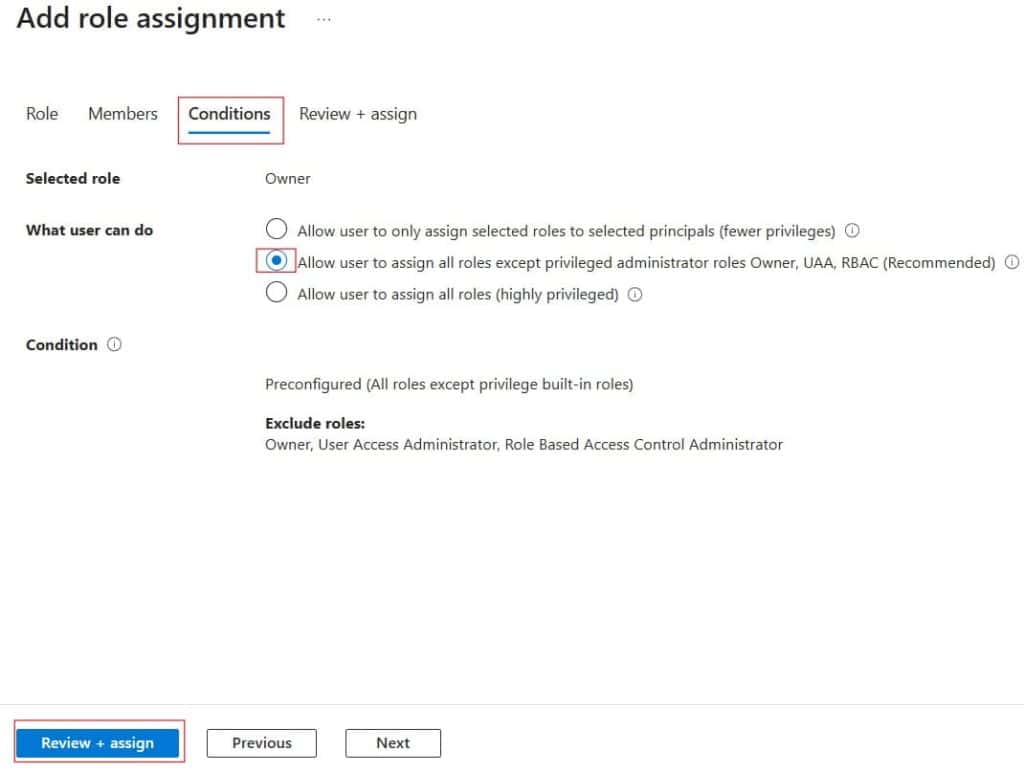
- Click Review + assign to write the configuration changes to the Azure resource group. Check out the screenshot below for your reference.
Managing the Directory: Granting Identity Admin Rights (Entra ID)
If you need to empower an IT support agent to manage user identities, reset passwords, or onboard contractors, you must grant them directory-level privileges within Microsoft Entra ID.
Step 1: Access the Identity Tenant
- From anywhere within the Azure Portal, click the search bar at the top of the window.
- Search for and select Microsoft Entra ID.
- In the left navigation pane under the Manage section, select Roles and administrators.
Step 2: Select the Administrative Assignment Type
- You will see an expansive list of built-in identity roles. Use the top search box to filter the list:
- Global Administrator: Full, unrestricted privileges to every directory service. Limit this role to a maximum of 2 to 3 break-glass accounts.
- User Administrator: Grants permissions to create accounts, modify user profiles, and trigger password reset tasks.
- Privileged Role Administrator: Grants the authority to manage the assignment of directory roles themselves.
- Click directly on the blue hyperlink title of the role you want to assign (e.g., click User Administrator).
- Click + Add assignments located at the top of the menu options.
Step 3: Bind the Identity to the Role
- In the flyout search field, search for the user account you want to elevate.
- Check the box next to their name and click Add.
- The user’s account will now possess directory administration authority. For security, have the user sign out and log back in to refresh their security token in the browser.
Advanced Governance: PIM and Least Privilege
In large cloud deployments, granting permanent administrative privileges is a risky practice. If an administrator’s account is compromised, your entire cloud infrastructure is exposed. To minimize this risk, implement the following advanced governance frameworks:
Implementing the Principle of Least Privilege (PoLP)
Never default to the Owner or Global Administrator roles out of convenience. If a team lead only needs to maintain virtual infrastructure, use the Virtual Machine Contributor role. Matching permissions precisely to operational job functions limits your blast radius if an account is compromised.
Transitioning to Just-In-Time (JIT) Access via PIM
If your organization utilizes a Microsoft Entra ID P2 or Microsoft Entra ID Governance license tier, stop using permanent active role assignments. Instead, leverage Privileged Identity Management (PIM).
With PIM:
- You configure a user as Eligible for an administrative role rather than permanently Active.
- When the engineer needs to perform an administrative task, they navigate to the PIM portal blade and request to activate the role.
- The activation workflow can enforce security checks: requiring a multi-factor authentication (MFA) check, providing a valid business ticket justification number, or routing the request to a senior manager for manual approval.
- Once approved, the role activates for a limited window (e.g., 4 hours) and automatically deactivates afterward, keeping your permanent attack surface at zero.
Video Tutorial
Conclusion
By establishing clear role separation, scoping permissions tightly, and moving away from permanent active permissions, you protect your environment from accidental data loss and security breaches. Keep your scopes tight, your assignments audited, and your cloud architectures fully secure!
You may also like the following articles:
- Microsoft Entra ID Sign-In Logs Where to Find
- What are the main benefits of using Microsoft Entra ID
- How To Setup Microsoft Entra ID

I am Rajkishore, and I am a Microsoft Certified IT Consultant. I have over 14 years of experience in Microsoft Azure and AWS, with good experience in Azure Functions, Storage, Virtual Machines, Logic Apps, PowerShell Commands, CLI Commands, Machine Learning, AI, Azure Cognitive Services, DevOps, etc. Not only that, I do have good real-time experience in designing and developing cloud-native data integrations on Azure or AWS, etc. I hope you will learn from these practical Azure tutorials. Read more.