
In this tutorial, I will walk you step-by-step through how to design, build, configure, test, and deploy a secure, scalable chatbot directly within the Microsoft Azure ecosystem. Whether you are an enterprise cloud architect or a solutions engineer building your first intelligent agent, this guide will provide the authoritative roadmap you need.
How to Create a Chatbot in Azure
Why Build Your Chatbot on Microsoft Azure?
Before getting into the step-by-step implementation, let us address why Azure remains a premier platform for conversational AI in enterprise environments:
- Enterprise-Grade Governance & Compliance: Azure provides HIPAA, SOC 2 Type II, and ISO/IEC certifications out of the box. Conversational data can remain strictly compliant with US data sovereignty policies.
- Seamless Multi-Channel Integration: Azure AI Bot Service lets you deploy a single backend and connect it natively to Microsoft Teams, Slack, Web Chat, SMS via Twilio, Facebook Messenger, and Direct Line API channels.
- Advanced Cognitive Capabilities: By combining Bot Framework SDK/Azure AI Bot Service with Azure OpenAI Service (GPT-4o/GPT-4 models) or Azure Cognitive Search (RAG architecture), your bot transforms from a rigid decision-tree agent into a context-aware conversational copilot.
- Unified Telemetry: With Azure Application Insights, every conversation, user intent score, latency metric, and exception trace is logged and queryable using Kusto Query Language (KQL).
Architecture Overview: The Anatomy of an Azure Chatbot
To build effectively, you must understand how the different Azure services interact under the hood.
| Component | Azure Service / Tool | Primary Responsibility |
| Conversational Engine | Azure AI Bot Service / Bot Framework SDK | Handles routing, turn-based conversation state, adapters, and multi-channel messaging endpoints. |
| Language Understanding / Generative AI | Azure OpenAI Service / Conversational Language Understanding (CLU) | Extracts intent, extracts entities, and generates natural language responses from ingested data. |
| Knowledge Base / Retrieval | Azure AI Search (formerly Cognitive Search) | Vector store and indexing engine used for Retrieval-Augmented Generation (RAG) queries. |
| Compute & Hosting | Azure App Service (Linux / Windows Plan) | Hosts the backend web application runtime (Node.js, C#, or Python). |
| Secrets & Identity | Microsoft Entra ID & Azure Key Vault | Manages managed identities, client secrets, and OAuth-based token exchanges. |
| Monitoring & Diagnostics | Azure Monitor & Application Insights | Collects request latency, conversational turn metrics, and custom telemetry events. |
Prerequisites
Before following this guide, ensure you have the following prerequisites ready in your development and cloud environments:
- Active Azure Subscription: A paid (Pay-As-You-Go) or Enterprise Agreement (EA) subscription with Contributor or Owner role permissions.
- Resource Group Access: Permission to provision App Services, Azure Bot Services, and Cognitive Services within your designated US region (e.g.,
East USorWest US 2). - Development Tools:
- .NET 8.0 SDK or Node.js LTS (v20+)
- Azure CLI installed locally
- Visual Studio Code or Visual Studio 2022
- Bot Framework Emulator for local debugging
- Azure OpenAI Access: Approved access to Azure OpenAI Service if you plan to incorporate foundational Large Language Models (LLMs).
Step 1: Set Up the Azure Resource Group and Foundation
Create the Resource Group
Open your Azure CLI or PowerShell console and log in:
Bash
az login
az account set --subscription "Your-US-Subscription-ID"
az group create --name "rg-enterprise-chatbot-prod-eastus" --location "eastus"
Register Required Azure Resource Providers
Ensure the necessary resource providers are registered under your subscription:
Bash
az provider register --namespace Microsoft.BotService
az provider register --namespace Microsoft.Web
az provider register --namespace Microsoft.CognitiveServices
Step 2: Provision Azure AI Bot Service in the Azure Portal
The Azure AI Bot Service acts as the communication broker between the end-user channels (such as Web Chat or Teams) and your bot application backend.
Create the Azure Bot Resource
- Sign in to the Azure Portal (
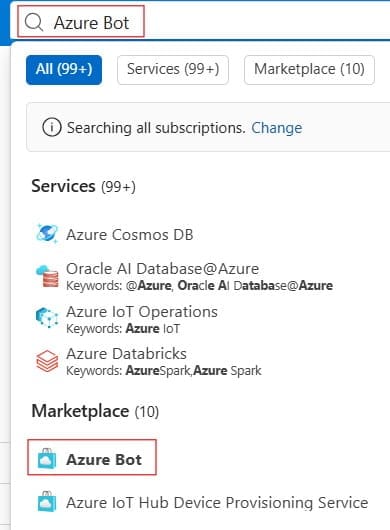
portal.azure.com). - In the global search bar, type Azure Bot and select Create.
- Under the Basics tab, configure the following parameters:
- Bot Handle: Provide a globally unique name (e.g.,
bot-customersupport-eastus-01). - Subscription: Select your target subscription.
- Resource Group: Select
rg-enterprise-chatbot-prod-eastus. - Data Residency: Set to
United States(or keep defaultglobal). - Pricing Tier: Select Standard (S1) for production workloads with SLA requirements, or Free (F0) for evaluation.
- Bot Handle: Provide a globally unique name (e.g.,
- Under Creation Type, select User-Assigned Managed Identity (recommended for production security) or Single Tenant / Multi-Tenant App Registration.
- Click Review + Create, then click Create. Check out the below screenshots for your reference.
Step 3: Develop the Core Bot Logic
You can develop the bot’s conversational backend using either the Bot Framework SDK (C# or JavaScript/TypeScript/Python) or through Azure AI Studio for low-code prompt-orchestrated bots. In this guide, I will demonstrate the enterprise SDK development approach using C# / .NET.
Initialize the Project Template
Using the .NET CLI, install the Bot Framework template and generate an Echo Bot or Core Bot scaffold:
Bash
dotnet new -i Microsoft.Bot.Framework.CSharp.EchoBot
dotnet new echobot -n EnterpriseCustomerBot
cd EnterpriseCustomerBot
Implement Conversational Turns and Activity Handlers
In the Bots/EchoBot.cs file, customize the activity handlers to process inbound messages and execute dialogue flows:
C#
using System.Collections.Generic;
using System.Threading;
using System.Threading.Tasks;
using Microsoft.Bot.Builder;
using Microsoft.Bot.Schema;

namespace EnterpriseCustomerBot.Bots
{
    public class EnterpriseCustomerBot : ActivityHandler
    {
        protected override async Task OnMessageActivityAsync(ITurnContext<IMessageActivity> turnContext, CancellationToken cancellationToken)
        {
            var userText = turnContext.Activity.Text?.Trim();

            // Route userText to Azure OpenAI, CLU, or database
            var replyText = $"Processed request: {userText}. How else may I assist you today?";

            await turnContext.SendActivityAsync(MessageFactory.Text(replyText, replyText), cancellationToken);
        }

        protected override async Task OnMembersAddedAsync(IList<ChannelAccount> membersAdded, ITurnContext<IConversationUpdateActivity> turnContext, CancellationToken cancellationToken)
        {
            var welcomeText = "Welcome to Enterprise Support. I am your automated virtual assistant. How can I help you today?";
            foreach (var member in membersAdded)
            {
                if (member.Id != turnContext.Activity.Recipient.Id)
                {
                    await turnContext.SendActivityAsync(MessageFactory.Text(welcomeText, welcomeText), cancellationToken);
                }
            }
        }
    }
}
Configure Configuration Settings (appsettings.json)
Configure your application secrets and Bot Service identifiers:
JSON
{
  "MicrosoftAppType": "UserAssignedMSI",
  "MicrosoftAppId": "<YOUR_MANAGED_IDENTITY_CLIENT_ID>",
  "MicrosoftAppPassword": "",
  "MicrosoftAppTenantId": "<YOUR_TENANT_ID>",
  "AISearchEndpoint": "https://search-eastus-enterprise.search.windows.net",
  "AzureOpenAIEndpoint": "https://oai-eastus-enterprise.openai.azure.com/"
}
Step 4: Add Natural Language Understanding and Generative Intelligence
Modern enterprise chatbots cannot rely solely on keyword matching. We integrate natural language processing to understand nuances, intent, and tone.
Core Approaches to Intelligence
- Deterministic Intent Classification (Azure CLU):
- Ideal for strict, high-risk transactional workflows (e.g., “Check Order Status”, “Reset Security Password”).
- Maps user utterances to specific entities and pre-configured action dialogues.
- Generative AI & RAG (Azure OpenAI + Azure AI Search):
- Ideal for unstructured knowledge bases, policy exploration, product discovery, and generalized conversational troubleshooting.
- Leverages vector search to retrieve relevant enterprise documentation chunks and passes them to GPT-4o with strict system prompts.
Step 5: Test Locally with the Bot Framework Emulator
Before deploying compute workloads to the cloud, I always conduct local validation using the official Bot Framework Emulator.
- Run your bot application locally:Bash
dotnet runYour web server will begin listening onhttp://localhost:3978orhttps://localhost:7181. - Launch the Bot Framework Emulator.
- Click Open Bot and enter your local endpoint URL:
http://localhost:3978/api/messages
- If testing locally without authentication, leave the Microsoft App ID and Microsoft App Password blank.
- Send test utterances (e.g., “Hello”, “Check policy requirements”) to verify turn responses, state management, and trace payloads in the emulator log window.
Step 6: Deploy the Backend to Azure App Service
Once your local tests succeed, publish the application to an Azure App Service instance.
Provision App Service Plan & Web App
Bash
# Create an App Service Plan (Linux Standard S1)
az appservice plan create \
    --name "asp-enterprise-chatbot-eastus" \
    --resource-group "rg-enterprise-chatbot-prod-eastus" \
    --sku S1 \
    --is-linux

# Create the Web App
az webapp create \
    --resource-group "rg-enterprise-chatbot-prod-eastus" \
    --plan "asp-enterprise-chatbot-eastus" \
    --name "app-enterprise-chatbot-eastus-01" \
    --runtime "DOTNETCORE:8.0"
Configure Messaging Endpoint in Azure Bot Service
- Return to the Azure Portal.
- Navigate to your Azure Bot resource -> Configuration.
- In the Messaging endpoint field, enter your public App Service endpoint:
[https://app-enterprise-chatbot-eastus-01.azurewebsites.net/api/messages](https://app-enterprise-chatbot-eastus-01.azurewebsites.net/api/messages)
- Save the configuration.
Deploy the Code via Azure CLI or CI/CD Pipeline
You can deploy using GitHub Actions, Azure DevOps Pipelines, or direct ZIP deployment via CLI:
Bash
dotnet publish -c Release -o ./publish
cd publish
zip -r ../bot-deployment.zip .
az webapp deploy \
    --resource-group "rg-enterprise-chatbot-prod-eastus" \
    --name "app-enterprise-chatbot-eastus-01" \
    --src-path ../bot-deployment.zip \
    --type zip
Step 7: Configure Channels and Publishing
Azure AI Bot Service abstracts channel-specific APIs so you do not have to write custom adapters for every platform.
Common Channel Configurations
| Channel Name | Best Used For | Configuration Notes |
| Web Chat | Public websites, customer portals | Embed directly via iframe or using the customizable WebChat JavaScript CDN library. |
| Microsoft Teams | Internal enterprise helpdesk, HR | Requires enabling Teams Channel in the portal and generating an app package in Teams Developer Portal. |
| Direct Line Speech | Voice assistants, mobile apps | Communicates directly with Azure Speech Service for low-latency streaming audio. |
| Direct Line API | Custom React / Mobile native apps | Secure REST and WebSocket protocol providing full control over custom UI and metadata tokens. |
How to Enable Web Chat:
- Under your Azure Bot resource, click Channels.
- Click Web Chat.
- Select an existing Secret Key or generate a new token endpoint.
- Integrate the Web Chat embed code onto your enterprise site using secure token exchange endpoints rather than exposing static secret keys in client-side HTML.
Security, Monitoring, and Enterprise Best Practices
Deploying a production chatbot requires strict adherence to cloud security and continuous monitoring standards:
- Enforce Managed Identities: Avoid storing client secrets in configuration files. Utilize Azure Managed Identities for all App Service to Bot Service and Azure OpenAI authentications.
- Implement Rate Limiting and WAF: Front your App Service with Azure Front Door or Azure API Management (APIM) with Web Application Firewall (WAF) policies to prevent DDoS attacks and unauthorized scraping.
- Continuous Telemetry with Application Insights: Log conversation duration, token consumption, sentiment drop-off, and response latencies.
- Prompt Injection Defense: If using Azure OpenAI, activate Azure AI Content Safety filters to detect jailbreaks, hate speech, self-harm, and malicious prompt injections before generating output.
Conclusion
Building an enterprise chatbot on Microsoft Azure gives organizations an extensible, highly secure, and intelligent platform for automated user engagement. By combining the structured conversational routing of Azure AI Bot Service with the generative power of Azure OpenAI and the reliability of Azure App Service, you can deliver natural, high-performance virtual agents across any digital channel.
You may also like the following articles:

I am Rajkishore, and I am a Microsoft Certified IT Consultant. I have over 14 years of experience in Microsoft Azure and AWS, with good experience in Azure Functions, Storage, Virtual Machines, Logic Apps, PowerShell Commands, CLI Commands, Machine Learning, AI, Azure Cognitive Services, DevOps, etc. Not only that, I do have good real-time experience in designing and developing cloud-native data integrations on Azure or AWS, etc. I hope you will learn from these practical Azure tutorials. Read more.