
Learning how to efficiently copy tasks—whether it’s a single bug fix or a massive hierarchical epic—is a fundamental skill for any DevOps professional or Project Manager looking to scale their operations. In this article, I’m going to walk you through every method for duplicating work items, keeping your backlogs clean and your productivity high.
How To Copy Tasks In Azure DevOps
Method 1: The “Copy Work Item” Feature (The Quick Fix)
The most straightforward way to duplicate a task is the native “Copy Work Item” function.
Step-by-Step Execution
- Navigate to your Backlog or Board: Find the specific task (or “Work Item”) you want to duplicate.
- Open the Task: Click on the Title to open the full view.
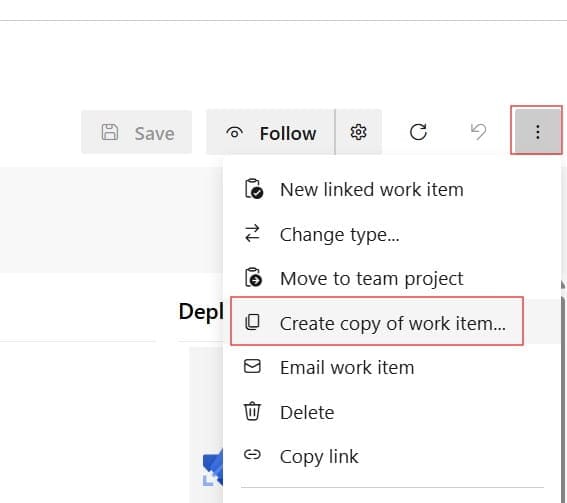
- The Actions Menu: In the upper right-hand corner, look for the three dots (…).
- Select “Copy work item”: A dialog box will appear.
- Choose Your Destination: You can copy the task into the same project or a completely different project within your organization.
- Toggle Links: You’ll see a checkbox labeled “Include existing links.” If you want the new task to be connected to the same Parent or Related items, keep this checked.
Check out the screenshot below for your reference.
Key Considerations for Copying
| Feature | Included by Default? | Notes |
| Title & Description | Yes | Always carried over. |
| Assigned To | No | Usually resets to “Unassigned” or the person copying. |
| Attachments | No | You must manually re-upload files. |
| Links | Optional | Requires checking the “Include existing links” box. |
| History/Discussion | No | The new task starts with a clean slate. |
Method 2: Creating a Task from a Template
If you find yourself copying the same type of task every Monday morning, stop using the copy button. You need Work Item Templates. I use these for recurring maintenance tasks, like “Monthly Server Patching” or “Quarterly Compliance Review.”
How to Build a Blueprint
To create a template, fill out a task exactly how you want it to look. Before saving, click the three dots (…) and select Templates > Capture. Name it something recognizable, like “Backend Feature Template.”
Applying the Template
When you create a new, blank task, simply go to the actions menu, select Templates, and choose your saved version. Azure DevOps will instantly populate all the fields—priority, area path, and tags—saving you minutes of manual entry.
Method 3: Bulk Copying with “Copy as HTML” or Excel
Sometimes copying one task isn’t enough. Perhaps you’re migrating ten tasks from a “Discovery” phase to an “Execution” phase.
Using the Bulk Edit Feature
- Go to your Queries or Backlog.
- Hold down the
Ctrlkey (orCmdon Mac) and select multiple tasks. - Right-click on the highlighted area.
- You can select Change Type or Move to Project, but for a true “copy,” most pros prefer the Excel Integration.
The Excel Power Move
For my fellow data enthusiasts, the Azure DevOps Office Integration is a lifesaver. By opening a query in Excel, you can simply copy rows of data and “Publish” them back to DevOps. This creates entirely new work item IDs while maintaining all the metadata you just pasted.
Method 4: Copying Hierarchies (Epics and Features)
Copying a single task is easy, but what if you have an Epic with five Features, and each Feature has ten Tasks? Manually copying those 51 items would be a nightmare.
For this, I recommend the “Clone” functionality available through various Azure DevOps Marketplace extensions, or by using the “Create Copy” feature at the Epic level.
Pro Tip: When you copy a parent item, pay close attention to the “Link to original” setting. If you don’t uncheck this, your new “Copy” will still be linked to the old parent, which can cause massive confusion during sprint reporting.
Method 5: Using the Azure CLI for Automation
As a technical trainer, I always encourage people to look toward automation. If your workflow involves copying tasks as part of a CI/CD trigger, the UI is your enemy. Use the Azure CLI.
You